Local Hypermaster SSO
Prerequisites#
- Certificates
- Root-certificate ADFS-Root.cer
- Signing-certificate ADFS-Signing.pfx
- Entra ID account with permissions on Enterprise App ServicePrincipal
- Minimal knowledge on how SAML2-protocol works.
- VisualStudio Marketplace - REST Client
- The New CommandCenter environment setup and running with goldenspiral.nl
Installing Certificates#
The Root-certificate - using the GUI. By right-clicking on the file and then select [Install Certificate]; Select [Local Machine], then Next, Next and [Place all certificates in the following store] and select "Trusted Root Certification Authorities", then OK;
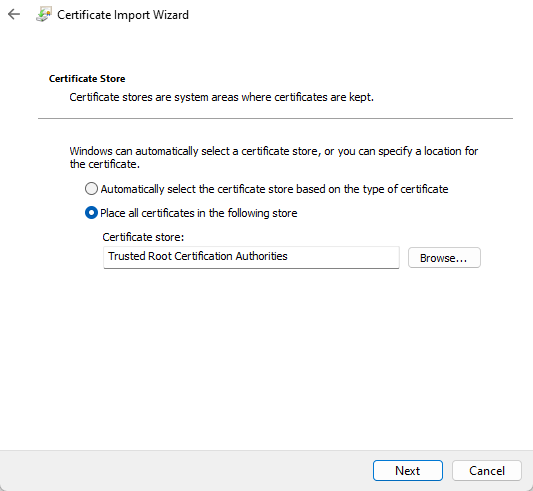
Then click Next and Finish.
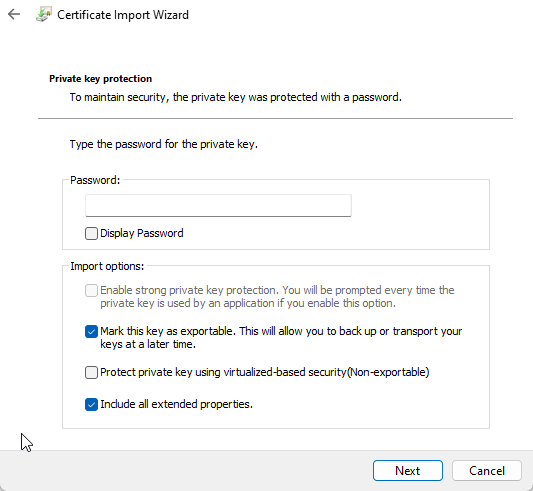
The Signing-certificate - almost the same process as the Root-certificate.
using the GUI. By right-clicking on the file and then select [Install Pfx];
Select [Local Machine], then Next, Next. On the Private key protection step leave Password blank, check [Mark the key as exportable.] and [Include all extended properties].
Click Next and [Place all certificates in the following store] and select "Personal", then OK;
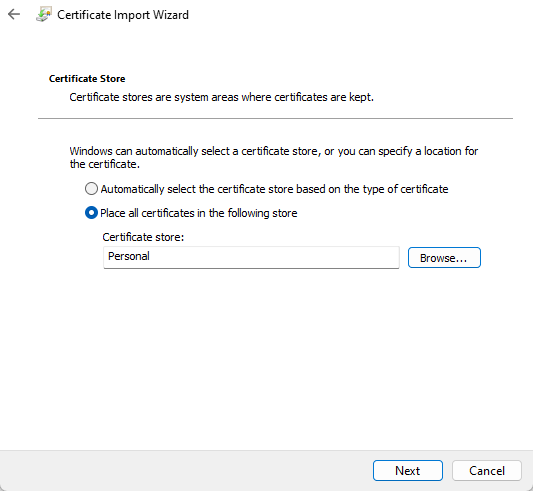
Then click Next and Finish.
If you're running the Application with the [IIS AppPool\DefaultAppPool] identity, you must grant the application pool access permissions on the private key of the Signing-certificate.

And navigate to the Signing-certificate, and then right-click end select [All Tasks], then [Manage Private Keys...]
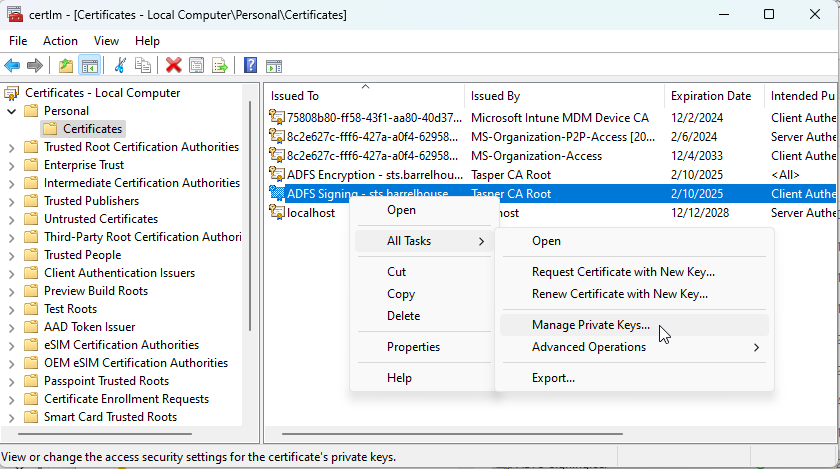
On the Permissions window, click [Add...] and enter the name of the Application Pool (e.g DefaultAppPool) IIS AppPool\DefaultAppPool and click on [Check Names], when successful the text will change and the Name is underlined; Now click [OK], allow everything and click [OK]
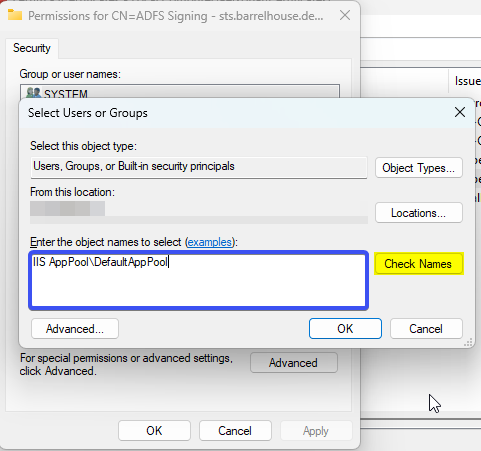
Name checked

Adding SSO in the BenefitManager#
Let's do this using the HTTP Rest Client and calling API's directly on de CommandCenter.
First we will need to query for a CustomerStage Identifier, the default Entra ID Application is configured for https://iis.goldenspiral.nl and SSO name hyper-local
In VS Code create a new file (ext .http) and copy & past the script.
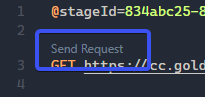
Then copy the Identifier and past as the @stageId in our script
@stageId=834abc25-8e6f-47b0-9e4f-469d9c42f9d4

GET https://cc.goldenspiral.nl/api/sso/{{stageId}}

###
POST https://cc.goldenspiral.nl/api/sso/{{stageId}}
Content-Type: application/json

{
  "sSOIdentifier": "hyper-local",
  "implementation" : "saml2"
}

###
PUT https://cc.goldenspiral.nl/api/sso/{{stageId}}/saml
Content-Type: application/json

{
   "sSOIdentifier": "hyper-local",
   "metadataUrl": "https://login.microsoftonline.com/f3408dcc-bd00-4d82-9c78-12aec626ea4e/federationmetadata/2007-06/federationmetadata.xml?appid=37446054-d14c-484c-8c97-31ba188400d2",
   "thumbprint": "23CE5B562D41D4A5F298D17A9B1676A9026D5456"
}

###
PUT https://cc.goldenspiral.nl/api/sso/{{stageId}}/toggle
Content-Type: application/json

{
  "ssoIdentifier": "hyper-local"
}
HTTP Rest Client
If you have the Rest Client extension install you will see:
To install the Rest Client goto the VisualStudio Marketplace - REST Client and click on Install, we can also use VisualStudio version 17.4 and higher have support for .http files out-of-the-box but not all features included
Adding Hypermaster to your BenefitManager#
In the new CommandCenter, when setup correctly, you can navigate to Admin Management
First-time sync
Click on Sync users *this will import all available and allowed users from Entra ID @taspersaas.nl
Click on your User Account and select the customer stage application to add the Hypermaster account.
Now you are ready to login https://iis.goldenspiral.nl/sso/hyper-local